Thanks to Dynamic Load Management (DLM), you can measure how much energy you use and give the rest to your car—turning the lights off in one room? DLM automatically adjusts the electrical power and provides the best possible charging experience.
Refer to this guide if you need to install DLM in a multiple-charger installation.
1. Installation requirements
Before activating Dynamic Load Management, go through the following requirements and ensure they are all met to guarantee proper functionality:
Install a Wallbox energy meter : DLM requires an energy meter sold by Wallbox to be installed. Compatible meters are available in the Wallbox catalogue.- Ensure you are installing the feature in a single-charger setup: if you need to install DLM for a multiple-charger installation, refer to this guide.
2. Enabling DLM
Step 1: Connect your App to your charger
- Before you begin, ensure your Wallbox charger and Wallbox app run the latest versions.
- Open the Wallbox app and log in using your credentials. You can easily register within the app if you don’t have an account yet.
- Select your charger and ensure your smartphone remains within Bluetooth range throughout the configuration process. Follow these instructions if your charger isn’t linked to your Wallbox account.
Step 2: Setting up Dynamic Load Management
Once your charger and Wallbox app are synchronized, follow these steps:
- Tap the “Settings” cogwheel icon in the top-right screen’s corner.
- Tap “Load Management” under “Energy Features“.
- Specify the number of chargers in your installation, including the Primary charger.
- In the Max current per phase field, specify the main breaker-rated current or subscribed current (in amps), whichever is lower.
- Turn on Dynamic Load Management.
- Tap “Save“.
Dynamic Load Management is now configured and activated for your charger.
3. Troubleshooting
Safety and Warranty Disclaimer
Per the applicable local regulations, the charger’s installation, maintenance, and servicing must only be carried out by qualified personnel. Unauthorized installations and modifications will void the manufacturer’s warranty.
3.1. User Troubleshooting
If you have a compatible meter installed correctly but are still having trouble activating Dynamic Static Load Management, it could be due to your charger not detecting the energy meter. Before contacting your installer, try these troubleshooting steps:
- Ensure you have a compatible energy meter installed correctly.
- Check if the energy meter is powered on.
- Power off and then on your charger. Sometimes, the charger may not recognize the energy meter if powered on after the charger.
- Verify if your charger’s software is up to date.
- Close the Wallbox app, reopen it, and disconnect and reconnect the charger via Bluetooth.
- For Carlo Gavazzi energy meters, ensure that the ‘Rx’ and ‘Tx’ icons are blinking in the bottom right corner of the energy meter screen. If not, try restarting the charger again, as it may not communicate with the meter.
3.2. Installer Troubleshooting
If the previous steps haven’t resolved the issue, the installer can perform the following checks:
- Ensure the wiring between the charger and the energy meter is correct, including proper connections and continuity. Use the appropriate cable type (Cat5e).
- Power off the charger and the energy meter, then measure the resistance between D+ and D- (or B+ and A- on the energy meter). It should measure around 60 Ohms.
- Check that the RS485 switch is in position T and the rotary switch is set to a position between 1 and 7.
- If CT clamps are being used, verify their position and orientation.
- Power on the meter first, then the charger, and ensure that the meter measures power consumption when the vehicle is charging with household appliances turned on. If the energy meter isn’t measuring vehicle or household consumption, it may be incorrectly wired or damaged.
Status displays for Commander 2*
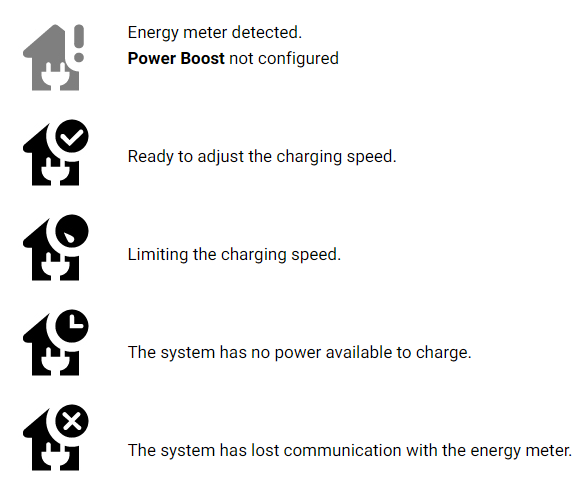
*These icons are displayed on the screen of your Commander 2. Icons may differ depending on the firmware version of your charger.